Father’s Day is right around the corner and trust me when I tell you THIS IS THE BEST GIFT YOUR DAD WILL EVER GET! This is the gift our newborn gave my husband last year for his first Father’s Day ever and honestly he almost cried!
My husband is a firefighter and must wear a strictly defined uniform to work every shift. However, I know he likes to have small items to remind him of us while he is gone. For instance, like many firefighters, he stashes a picture of us inside his helmet. So I wanted to give him a way to have Penelope close even while at work.. And this is what I came up with…
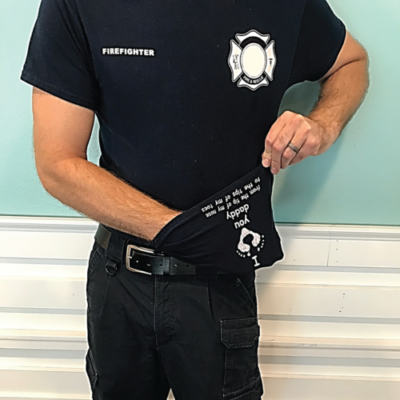
Your dad does not need to wear a uniform for this gift to be perfect. He could wear a uniform, scrubs, a polo shirt or a suit every day. You can place your design anywhere on any item so he can see it, but where nobody else can see it. It will be like your little secret!
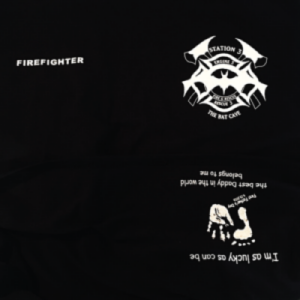
Great places to put designs are the inside of a shirt or scrubs at the bottom. I placed it upside down so he could see it while wearing it. You can also do it on the backside of ties or collars or inside suit jackets.
Now this gift does take some planning and a little bit of time. But only one tool! Hand and Foot Print Ink. You can easily find this on Amazon, Walmart or any craft store.
Also, you really need about 3 weeks to pull this off, but with some “express/rush it” dollars and a little stress you could do it in less time.
In my opinion, it is best to use black print ink, as you will have the opportunity to change the color later depending on your final design. I find that black makes the best hand and foot prints.
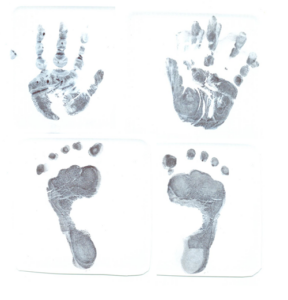
Of course, step one is to make the prints. I used both hands and feet in my final designs. It is best to get them all so as you finalize your designs, you have all options to choose from. You can collect the prints on any paper. I used large paper plates to have a sturdier surface to work with. Getting baby prints is not easy, so if you’re 18 and doing this for your dad – it will prove to be much easier. 😉
Also depending on the size of the ink pad you use compared to the child’s size, you may have to roll it or press the ink on their hands and/or feet before pressing on paper to get the print.
You should take each hand and each foot separately. Do not think you have to take them exactly as they will appear in your final design. You or your graphic designer can manipulate them in any way you desire.
Here are the prints I made.
The second step is design inspiration. Google handprint designs for dad or footprint designs. Make sure to click on the images tab and scroll through all the designs that come up to get inspired on what you would like to do.
Step three is creating your designs. There are many ways to do this. You can do them yourself if you have the skills on a site like canva. You can also hire someone on a website like Fiverr.com. In the next step, I will recommend using Etsy.com. If you use someone on Etsy to print the design, it is possible that the shop owner may be able to also create the design.
First you need to scan the prints as a photo. Those photos will be used by you or your designer to make the final design by manipulating them into the format and colors you want, along with any wording. You will also be able to fix other little things like a lighter spot in the print.
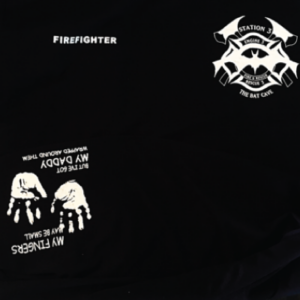
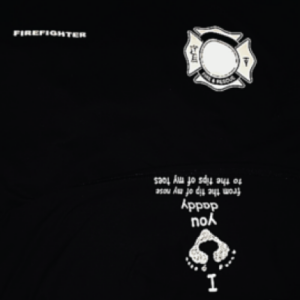
When preparing your designs, you do not need to worry up front about colors and sizes, just focus on the design that you want. You will finalize the design once you know where you will be placing it. For example, I knew I would be using my husband’s uniform shirts and that those are navy blue, so I went with a solid white design as it would show up best.
Now if it is important to you that the print on the item be the size of the actual hand print or foot print, you need to take size into consideration. This was not important to me, so I sized the final designs to the area I had to work with.
Here are my final designs.

Step four is getting your design printed on the item or items you have chosen. There are several options here. To be honest, I lucked out because I knew the guy who printed the uniform shirts for my husband’s department. I went straight to him and bought the shirts and he printed the designs for me. All I had to do was send him jpegs of the designs.
If you are not in a position to find out this information or it just doesn’t apply- no worries. Find a local printer. Do a Google search for [your area] + custom t-shirt printer. Now you don’t have to do a t-shirt, but this is a best way to find stores that do custom screen prints in your area.
You can also go on Etsy.com and find a shop owner that does personalized orders. This will take time because you will have to mail your item to that person if it is a specific item. If not, they may have that item or may be willing to buy it and charge you for it. One shop that can do custom orders for you is Naughty Cat Apparel . Check them out and ask Linsey about your specific project.
Another option is iron ons. I have not personally done this, but from talking to some crafty mates- it can look great. I have found two options for iron ons. First, you can buy printer t-shirt transfer paper and do a total DIY or you can order a custom iron on from Etsy or another online store. I have been told custom iron ons stand the test of time better than the transfer paper. Again- I have not used it, but wanted you to have all your options!
So here are my final shirts!
Copyright © 2024 Michael Grace Gifts- All rights reserved.